There are two M/A Com radios called the 300P. This page deals with programming the conventional variety of the 300P Portable (Product Code KB) and the 300M Mobile (Product code KA).
For info on the EDACS 300P (Product code KD) Click here
The TQ3393 and TQ3396 programming cables connect directly to the serial port of the computer. No interface box is needed, as the level shifter is built into the cable.
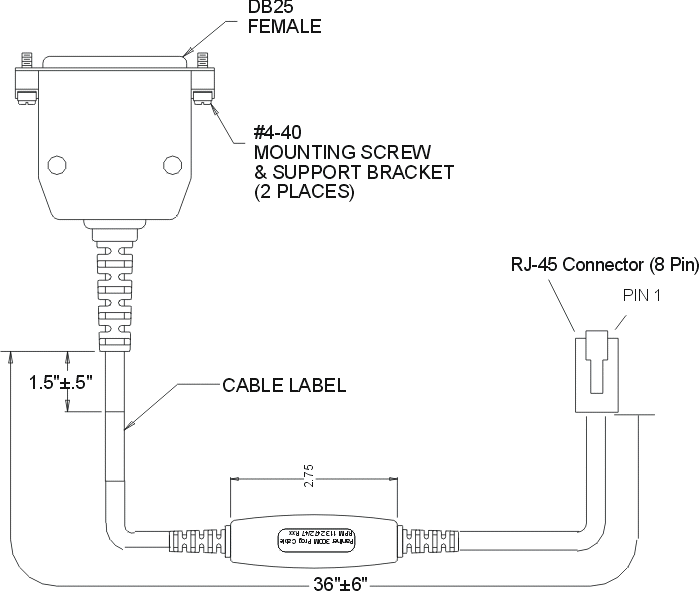
Programming Cable Outline Diagram TQ3396 for 300P (RPM 113 2472/43)
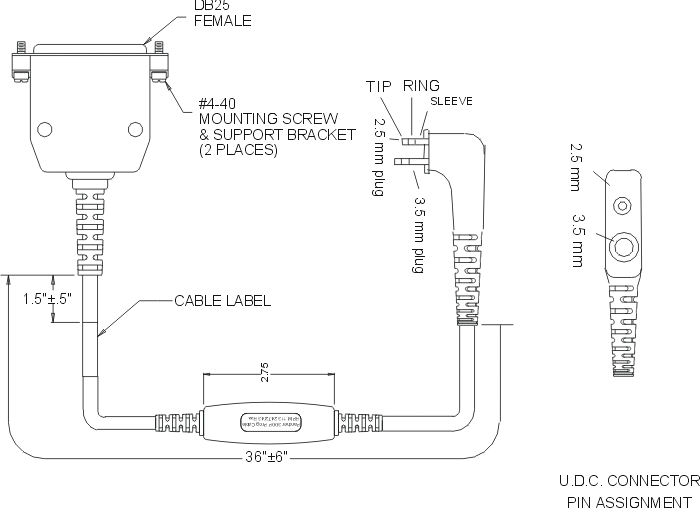
Programming Cable Outline Diagram TQ3393 for 300M (RPM 113 2472/47)
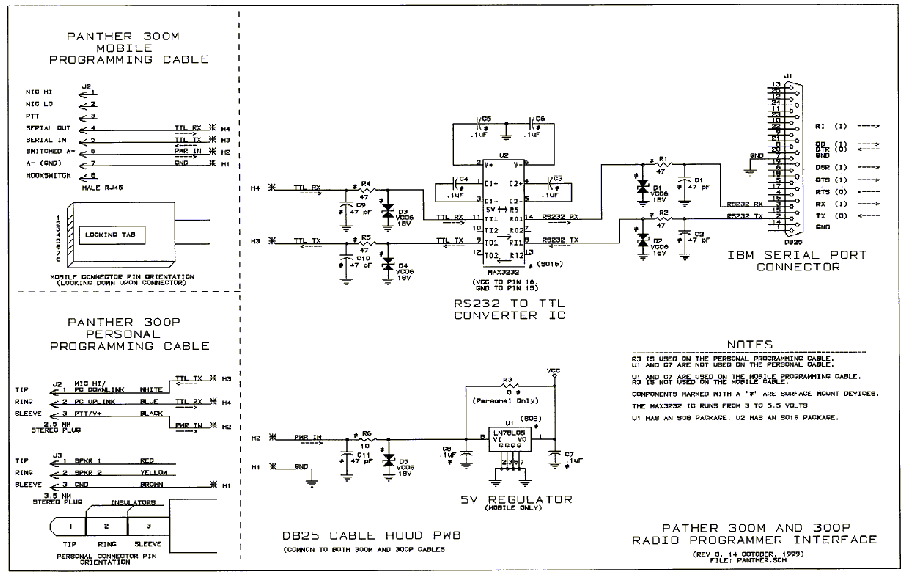
Programming Cable Schematic for both 300P and 300M
300P Model Numbers
300M Model Numbers
300P to 300P Cloning Cable TQ3397 (RPM 113 2472/40)
300M to 300P Cloning Cable TQ3395 (RPM 113 2472/41)
300M to 300M Cloning Cable TQ3394 (RPM 113 2472/42)
CAUTION
The procedure must be fully completed for each programming action before beginning a subsequent programming action. Failure to follow this procedure completely may result in partial or total corruption of Personality, Tracking, and/or Feature Data. Due to this possibility, read and save Tracking and Feature Data to a file before performing any other programming action.
This procedure affects all programming actions for the PANTHER 300M mobile radio, and the PANTHER 300P portable radio, including:
‧ Flash/personality insertion (using ProGrammer software)
‧ Flash only (using "Maintenance")
‧ Personality insertion (using ProGrammer software)
‧ Personality read (using ProGrammer software)
‧ Tracking data read (using "Maintenance")
‧ Tracking data insertion (using ProGrammer software)
‧ Feature data read (using "Maintenance")
‧ Feature data insertion (using ProGrammer software)
1. Connect the radio to the computer using the proper programming cable.
2. Ensure the power to the radio is OFF.
3. Press and hold the Option 1 button on the radio. Using the ON/OFF/Volume knob,
turn the radio power ON.
4. Release the Option 1 button and the radio will enter the programming mode. When
the radio enters the programming mode, the LED will flash green and P will appear in the display.
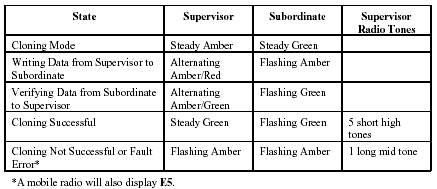
CopyCat™ Technology, a cloning feature, allows supervisor radios to duplicate radio personalities into subordinate radios on-site, without a technician or PC.
1. Ensure that the power to both the Supervisor and Subordinate radios is OFF.
2. Connect the two radios together with the appropriate cloning cable.
3. Enable Cloning Mode in the Supervisor radio:
Mobile: Press and hold both Option buttons while turning the radio on.
Portable: Press and hold the Option 1 and Clear/Monitor buttons while turning the radio on.
4. Enable Cloning Mode in the Subordinate radio:
Mobile: Press and hold the Option 2 button while turning the radio on.
Portable: Press and hold the Option 1 button while turning the radio on.
5. The radios are in Cloning Mode and commence the cloning process.
‧ The Supervisor radio will verify that the personality has been cloned properly during Cloning Mode.
6. If the entire personality is successfully cloned and verified, the Supervisor radio will enter the Cloning Successful state.
‧ The Supervisor radio will remain in the Cloning Successful state until it is power cycled.
‧ The Subordinate radio will remain in the Cloning Successful state until it is power cycled.
If the radios experience the Cloning Not Successful or Fatal Error state, power cycle the radios and re-initiate the Cloning Procedure.
LED Indications
[ Home ] [GE
Tech ] [Programming]
please send additions or corrections to getech@hallelectronics.com
Hall Electronics, Inc.
815 E. Hudson St.
Columbus, Ohio 43211
USA
(614) 261-8871
www.hallelectronics.com
Last updated 10/21/2001